
During a cleaning and inspection of our oven, Laurie noticed two lonely wires which turned out to be one wire that had melted in half.

Then, after a few times using the oven, we determined it was getting way hotter than it should. Let’s just say your stove top should never get hot enough to melt completely through the cord on your coffee pot when it is set to bake at 350. It was time for a new coffee pot and time to learn how to work on an oven.

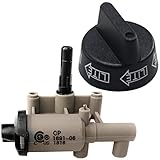
After hours of Google’ing, reading, looking through parts lists, and browsing websites we learned that, unfortunately, the part which needed replacing cannot be purchased by itself. We had to replace the whole thermostat/knob/other stuff assembly. The cheapest we could find the part need for our oven was on Amazon for a total of about $55 with shipping. It is the Whirlpool Part Number 7515P046-60: THERMOSTAT![]() . With the hunt over, the part ordered and delivered, it was time to install it!
. With the hunt over, the part ordered and delivered, it was time to install it!
Be aware, there are often several ways to do something. We aren’t saying our way is the right way, just that it worked for us.
Tools Needed


- Philips head screwdriver
- Crescent wrench
- Pair of Pliers
- 13/16″ Wrench
- 1/2″ Wrench
- 7/16″ Wrench
- 5/16″ Wrench
- A flashlight
The Process – Dismantling the Magic Chef Oven
- Turn off your LP We also turned a burner to the ignite position, lit it, and let it burn until it went out. We then turned off the burner, waited a few seconds, and lit the burner again. We repeated this process several times to clear the line.
- Turn off your LP powered appliances. Things like propane powered water heaters will not work without propane. Make sure this stuff is off so you don’t have an issue.
- Make sure you turned off your LP
- Remove the oven knobs. This is pretty easy; just grab, and pull. We laid them out in order so we would remember which knob went where.
- Remove the metal stove top grill by lifting it off, and the stove top cover by lifting the front to swing it up and tilt clockwise to release and remove it from the oven.
If you use your stove often, you will now see how dirty it is. - There are several phillips head screws that will be removed. These are the screws which hold the burners in place and that hold the big piece holding everything in place down. They are located in these locations:
 Remove these screws, and get everything out of your way.Eww….
 - Disconnect the gas and other lines from the knob and the “big piece holding everything in place” (this is the part which delivers the gas throughout the stove/oven, we do not know what it’s called). You will simply loosen the nuts using the various wrenches.
- You should now be able to freely lift the big piece holding everything in place off of the gas/etc. lines, and flip it over. On the bottom, you will see the bolt holding the thermostat assembly on the “big piece holding everything in place”.
We did not have a wrench this small, and instead carefully used the Crescent Wrench to remove the bolt.
Note: A Crescent Wrench likes to “slip” on nuts and bolts and can cause stripping. If using this tool, be slow and cautious of this. - The sensor to the thermostat assembly is in the top rear of your oven. Simply “lift” it off the clip it is on, and feed it back through the hole in the top of the oven to remove it.
- If your stove looked anything like ours did, you now have a perfect opportunity. With everything now removed, grab a vacuum and your favorite cleaning tools, and get to cleaning!


That’s it! You have removed the thermostat assembly and now it’s time to install the new one. To do that, follow these directions backwards to put everything back together.
Handy Reference
- You can see the exploded view of the Magic Chef oven on sears website.
- From what we could gather, the original part number for the thermostat was 74009855, it has been replaced with an updated part number 7515P046-60
- The part is for sale on Amazon – Whirlpool Part Number 7515P046-60: THERMOSTAT

Leave a Reply