
At some of the locations we stay, like Alan’s parents, a handy sewer hook-up is not always available. In looking for a way to dump our tanks, this is where we came across the Sewer Solution![]() (Read our post on the SewerSolution). While it is an awesome product, we needed to dump into a sewer cleanout approximately 100 ft. away, and it seems the previous owners of our camper gunked up the tanks more than the SewerSolution could fully help us with.
(Read our post on the SewerSolution). While it is an awesome product, we needed to dump into a sewer cleanout approximately 100 ft. away, and it seems the previous owners of our camper gunked up the tanks more than the SewerSolution could fully help us with.
Setting Up the SewerSolution
The first step was making sure we could dump. To do this, we located a sewer cleanout in Alan’s parent’s basement. The house was built in the 60’s, and finding a cleanout that was not fused shut was a bit of a challenge.
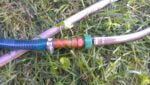
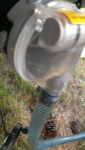
Once the cleanout was located, we knew it was too small to use the SewerSolution’s attachment, and we would have to run a straight hose in to the cleanout. This would require attaching a standard water hose to the larger SewerSolution hose. Luckily, the garage is stocked with the oddest, random parts Alan and his dad can find. Enter, a water hose threaded pipe.
-

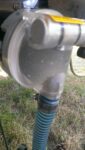
- The SewerSolution connected to a standard garden hose.
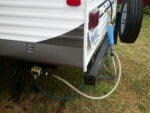
With the sewer solution now connected to a 100 ft. water hose, we were ready to give it a water source. As you can see, Alan loves going a little overboard, and preparing for every situation. The water source has been gradually modified since our original hook-up, and now…
-

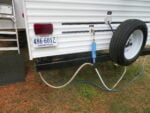
- Fresh water hook ups and filter on rear of camper
-
- Fresh water hook ups, sewer solution, and filter on rear of camper
-
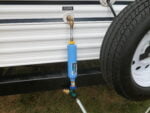
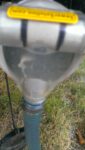
- Sewer Solution fresh water hook up
Our water hook-up splits, allowing a short hose (with a backflow preventer on both ends) to power the SewerSolution. This makes set-up much faster and does not require our camper water to be shut off during our dumping process.
And, that’s it. Our SewerSolution is hooked up and ready to go.
Super Cleaning Our Waste Water Holding Tanks
Our grey water tank had various surprises for us that we could see through the clear front of the SewerSolution. Even though the SewerSolution was doing a great job of cleaning out gunk, our black water tank was always reading 2/3 full, and it seemed as though our grey water tank was filling much faster than it should.
We had been dumping copious amounts of dawn in to the tanks, flushing with water, and hoping things would clear up. But, nothing seemed to work. Again, thanks to the internet, we came across a post titled Peeeuuuw! What is that smell? Managing your RV Holding Tanks. Following the advice in the post, we dumped our tanks, picked up a 32 oz. jug of Calgon Water Softener![]() , and dumped 1/2 down the toilet and half down the tub.
, and dumped 1/2 down the toilet and half down the tub.
While using our tanks as normal, the Calgon worked its magic, softening everything up. When it was time for our next tank dumping, we topped off the black water tank (we always fill the grey first) and started the process.
Cleaning the Black Water
How to put this… We do not currently do our time consuming business in the camper. Seeing, still, those particles coming out of our tank shows us there is still plenty of cleaning to be done. The difference, however, in the start and ending SewerSolution “back flush” was pretty substantial.
-

- The SewerSolution on black water tank, dump started.

-
- The SewerSolution on black water tank, dump finished.
Cleaning the Grey Water
In our camper, the grey tank’s contents often look as bad as the black tank and, when the tank is full, the water that backs up in to the tub smells horrible. Seeing the contents while flushing with the SewerSolution, we are not 100% certain what the white build-up is, but suspect it is calcium. With this dumping, we had a lot more coming out of the tank – hopefully because it is all cleaning out.
-
- The SewerSolution on grey water tank, dump started.
-
- SewerSolution on grey water tank, dumping chunks of gunk.
Even after several back-flushes, the white gunk kept coming. After a few times, we shut the valve, cleaned out the SewerSolution, and added another round of water softener to both tanks.
We decided it was time to use an old home remedy and see what happens. Right before our van camping trip to Maryland, we added a gallon of vinegar and a bit of water to the tanks and let it sit. Upon returning, four days later, we emptied the tanks and were surprised by the large chunks of white and various pieces of garbage coming from the tanks.
This particular piece of gunk greatly surprised us.
-
- Huge piece of white stuff in grey RV tank

-
- Huge piece of white stuff in grey RV tank

-
- Huge piece of white stuff in grey RV tank

A few weeks later, and we are still seeing various chunks coming from the tanks. Things are not perfect, but they are improving and the water that backs up in to our tub now does not smell like rotten garbage. This shows that proper tank maintenance can be pretty important while you’re living in your camper.
Have a special trick for keeping your tanks clean? Leave us a comment and tell us about it!

John
This YouTube video might shed some additional light on your situaton: https://www.youtube.com/watch?v=IoL2w07GeFo