Road Work Play

Full Time RV Living Blog

How To Have an Address When Full Time RVing

How to Have a Address When Full Time RVing

One of the first things new full time RVers need is an address. Your insurance will ask where your RV is “located” most of the year, your driver’s license needs your physical address, and if you want to register to vote, it all requires a physical address.

You first step is to choose what state you are going to call your new home. There a several states to choose from, including Texas, Florida, South Dakota, and a few others. You’ll want to research states that work for full time RVers and choose the one that best fits your needs.

When it was time for us to go full time, we chose Florida because it’s where we planned to spend our first few winters as full timers, there is no yearly state inspection, no state income tax, and a few other things that made it more convenient for our situation.

Once you have your state chosen, you will need to create an account with one of the mail forwarding services for that state. Your options include Escapees in several of the full timer states and, our chosen service, St. Brendan’s Isle in Florida.

Once you have your account and address set up, it is simply a matter of visiting the state’s DMV website, and determining what you need to start transfering your license. Many times, you can also find a “How to become a resident” page that is great for full time RVers. For example, St. Brendan’s Isle has a guide to becoming a Florida resident.

With your state residency changed and your mail forwarding account created, you are now ready to start handing out your shiny new address to any organization that needs it.

Not sure how to get all the mail that your mail forwarding will be accumulating? Need to just get a few items, without the need to change residence?
We have a post for how to receive your mail on the road too!
 

Replacing Our Exterior Slide Seal

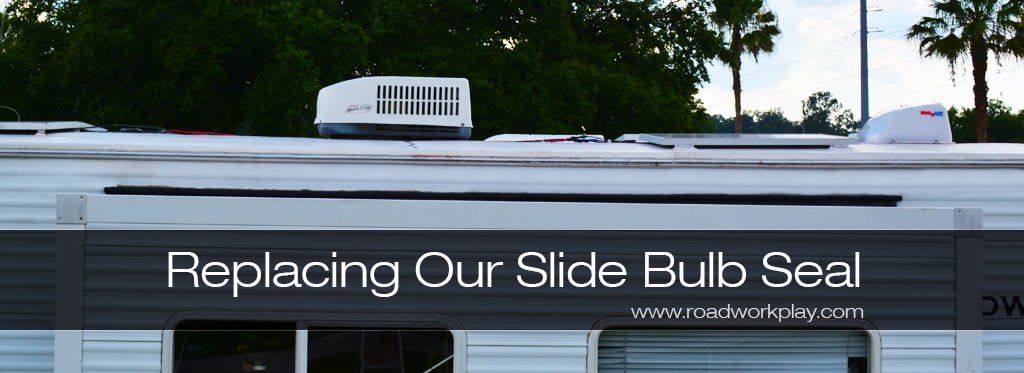
Replacing Our Slide Bulb Seal

The top slide seal on our camper was in pretty bad shape. With all of the Facebook posts we’d seen, it looked like replacing even a portion of these slide seals is super expensive to have done by a dealer. Being we love DIY we decided to do it ourselves. We began looking up slide seal costs. RV websites and a local dealer wanted over $400 for the single bulb seal we needed. Yes, over $400 for a single bulb slide seal.

We did some shopping around, and found exactly what we needed – actually, almost 20 foot more than we needed – on Amazon for less than $100. Yes, that $400 slide seal was less than $100!

As far as replacing your RV slide seal… If your wiper seal is still in good condition, as ours was, then this process is super simple. Here’s how we did it in less than a couple of hours.

Things you’re going to need.

Removing the Old Seal

For some reason, I was a dunderhead and did not start taking photos right away. We’ll have to work with what I have 🙂

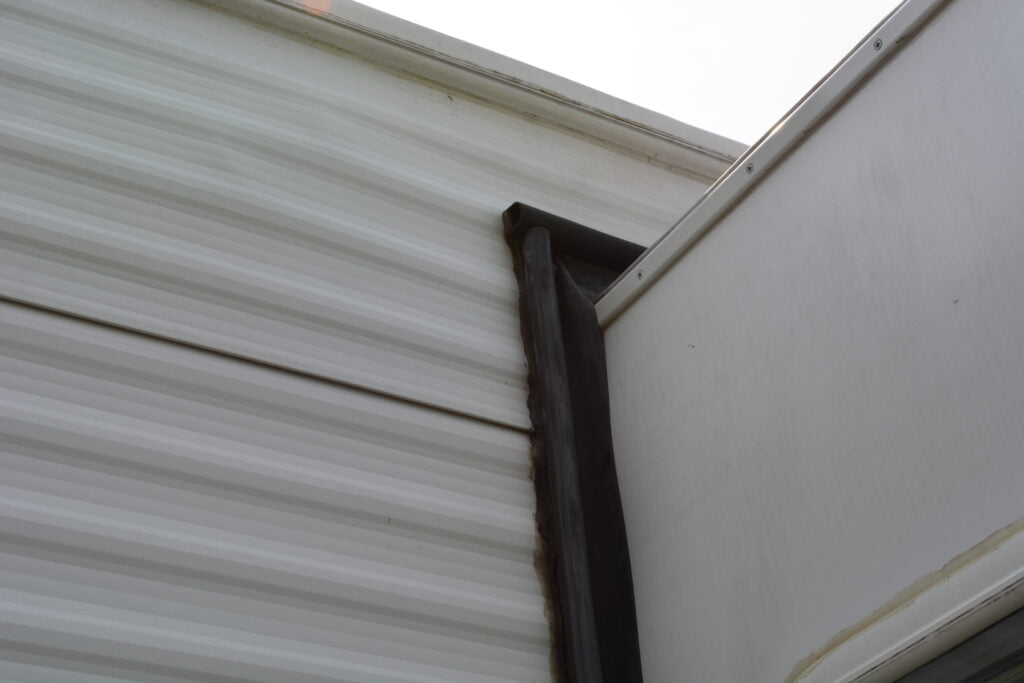
Old Slide Seal

As you can see, our old seal was in bad shape. Cracking, smushed and, in some places, falling apart.

The first step, was to remove the staples on each end of the seal. This was done by using a pair of pliers, “jiggling” the staples, and pulling. With the staples out, it is simply a matter of grabbing the old seal, and pulling. Our seal was deteriorated to the point that it just pulled off, without even needing to slide it off the track.

Old Slide Seal Removed

With the old seal removed, we finally remembered to start taking pictures. Here you can see the bad condition our seal was in.

Slide Wiper Seal & Bulb Seal Track

With the old seal removed, you can see the track the bulb seal slides into.

Sealing Things Up

Now is the time to remove any remaining staples from the old slide seal, and seal the holes up with Proflex RV. If there are larger holes, like the one in the above photo that can be seen where the track meets the metal of the rv if you look closely, it’s a good idea to patch them with Butyl Tape before covering with Proflex.

We did this a little out of order, which is why you see bulb seal in these photos.

Installing the New Seal

Once your caulk is dry, or if you have clearance to add the seal without disturbing it, you can install the new bulb seal. Simply slide the new seal onto the track, and begin pushing it down the length of the wiper seal track. Our seal was done from one end – the starting end – by one person, and went on smoothly. If you seal sticks, you may need to have someone feed the seal along from the other end.

New Slide Seal in Place

Slide the new seal until it is in the location of the original. It should protrude slightly over the lower, vertical seal.

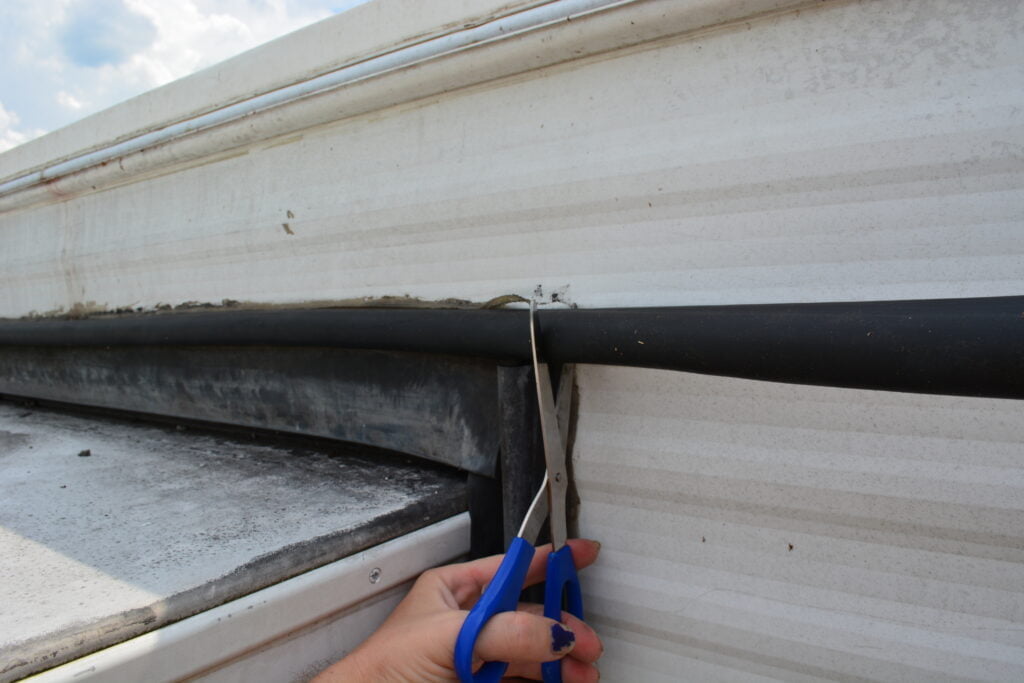
Cutting New Slide Seal

Cut the other end of the slide seal, leaving the same overhang as before.

If needed, you can now add any staples to hold things in place. We did not staple our seal down, as any time it could move, the slide will be holding it in place. You will also want to caulk any areas where water may enter your rig around the seal. Our seals are pretty solid already, and this was not required – but it’s always good to double check.

And, that’s it! We easily replaced our RV’s exterior bulb seal. The side slide seals use the same process, should any of yours be worn. While you have your ladder out, don’t forget to inspect your roof for any needed repairs. We have a post on sealing up your camper, if you need tips on that too!

How Do You Secure Items While Traveling in Your RV

How to Secure Items While Traveling in Your RV

When you’re traveling down the highway, the last thing you want is one of your knick knacks or pictures falling and breaking, or even worse, becoming a projectile and heading straight for your head!

When it’s time to secure items in your RV, you have a few options for holding down those precious keepsakes and random loose items.

Mounting Putty

We use mounting putty for holding down everything from planters to bobble heads. It’s easy to apply, doesn’t leave a mess behind, and can be reused over and over, as long as it doesn’t get too dirty.

Camping Straps

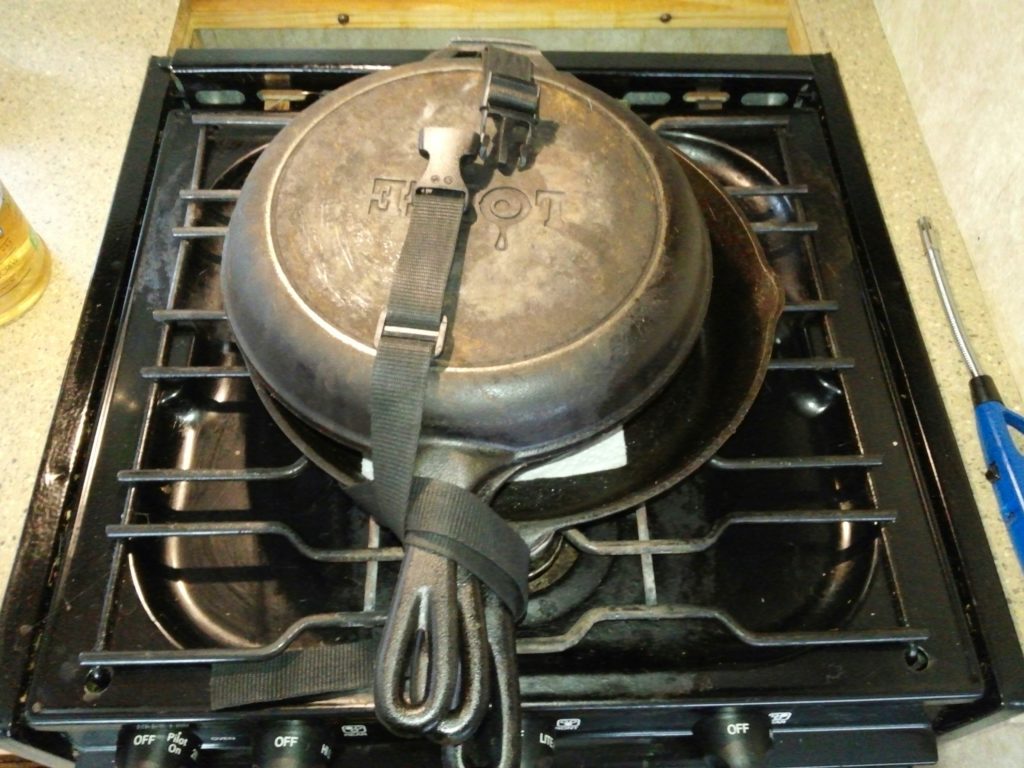
For some larger items, like our printer and our cast iron pans, we use camping straps to hold things in place. We also have a post on how we strap down our cast iron pans for travel.


Tension Rods

You know them, you may use them in your fridge, but did you know you can use them EVERYWHERE!? That’s right! We use some in our …drink… cabinet to hold bottles, in our office area to hold books and storage bins in place, and much more.


Velcro!

Pictures, containers, things that you want to stick and unstick and stick again will love some velcro. Plus, it has that satisfying sound…


Bungee Cords

When all else fails, grab a bungee cord.
It’ll work for now.
We keep a bunch of these around, just in case. No where to hook them? No problem! Just grab a pack of screw in hook eyes, and make your own bungee cord hooks on each side of all your loose objects.

Where Do You Find Fresh Water When Traveling Full-Time in Your RV?

How to Find Fresh Water on the Road

Out of all our supplies, water seems to be what we go through the fastest. Knowing where to find water when on the road is one of the most important pieces of information to have, below we provide you with a few places to get both filtered drinking water and regular city water.

Filling Your Fresh Water Tank

Many gas stations have a water hookup. The location of the hookup will vary. Truck friendly fuel centers and truck stops often have hook-ups at the truck fuel pumps, some have them next to the air fill and vacuum areas, some regular gas stations have a random faucet at a curb, or on the side of their building. Whenever we have needed to ask, the clerk was more than willing to let us fill our tanks. Just make sure any water you use is potable water, if you plan on drinking it.

Lots of local parks have hookups to water their gardens. If you ask, they will often let you fill your tank up off their potable water hose.

Rest areas in some states have fresh water fills (and dump stations, too!). A quick Google of the state you’re in and “rest area RV dump” should point you in the right direction.

RV Park Water Faucet

RV Parks! Even if you’re not staying there, they’ll be more than happy to take a few bucks for a dump and fill. Call first – Often, they will tell you they have fresh water fill on the phone, then when you arrive tell you the water is non potable. When this is the case, press the fact that you need water, and called ahead to make sure you could fill. They always work it out so you can fill, often by directing you to an open RV site where you can use the water hookup. It should run you $5-$10 at most locations for a dump and water fill. Often, just a water fill will be free.
Some locations will try to charge you $30. Laugh at them. Laugh hard. Then call somewhere else.

Finding Filtered Water, and Small Quantities

Walmart, some Home Depots, and various grocery stores have a water fill machine. It’s usually around $0.25 – $0.35 per gallon. For our drinking water, we carry four 6 gallon water jugs, using a Dolphin Water Pump, and two 7 gallon jugs with a spigot. All of our drinking water comes from these machines, allowing us to never have to worry about chlorine or eggy flavor.


Some Walmarts and hardware stores – like Ace Hardware – will let you fill a jug from the hose in their garden center. Simply ask and see what happens.

You can even try checking directly with the chamber of commerce or parks in your area. For example, in Zephyr Hills Florida, there are multiple Zephyr Hills drinking water fill ups with a cost of only $0.25 cents per gallon, paid on the honor system. We have also been directed to spigots and told we can fill up using them at no charge.

Looking for more RV’ing tips? Check out our RV How To’s section for all our awesome tips!

Starting Your Own Tee Shirt Business

How to Start Your Own Tee Shirt Business

One of the questions we are often asked, is how we make money on the road to fund our travels. Designing and selling tee shirts is one of our income streams, and it is easier to start doing than you may think!

I don’t have room to store tee shirts!
Great news, you don’t have to! There are websites offering POD (Print on Demand) services. These websites allow you to upload your artwork and sell it on anything from tee shirts, to coffee mugs, to pillows. You simply upload your artwork, select some product options, and let them handle everything else

No design experience? No problem!
All it takes to start selling shirts are a few good ideas. If you have the ideas, but lack the knowledge of design programs, like Photoshop or Illustrator, there are designers out there willing to work for less than $10 per design. Websites like Fiver and others will help pair you with a designer that will fit your needs.

Which POD Sites Really Work?
As always, we do not recommend it unless it works, and we’ve successfully sold our designs on the following sites. Creating accounts and selling on these would be your best place to start and will net you the most sales.

  • Merch by Amazon – Amazon’s massive audience has netted us the most sales over any of the other platforms. At the time of this posting, Merch is only shirts.
  • Redbubble – Another site bringing in steady sales, Redbubble is one of the larger POD companies, offering a wide variety of products to sell your designs on.
  • Teepublic – Lower in sales than some others, but still worth a mention. Teepublic is another site offering way more than just tees.
  • Cafepress – CafePress is another site offering a large amount of products for your design to be printed on. While the sales from this site are not as steady as some, we do still receive the occasional sales.
  • Etsy / Printful – That’s right, you can sell your shirts on Etsy and have them fulfilled by a company called Printful. You simply set up your products in Printful, sync everything over to your Etsy store, make a few adjustments in Etsy, and publish. From there, everything is automated! When an order comes in, Printful will automatically handle everything and ship the shirt to your customer.
    Printful can also sync your shirts to your own website.
  • Threadless
  • Teespring
  • Zazzle – Zazzle makes us the least of any of sites on this list. If you’re successful, leave us a comment and let us know!

Camping and RV Do’s and Don’ts

RV and Camping Do's and Don'ts

You know how it is. You find a great spot to spend some time camping, you get all settled in, then “they” show up. Well, no one wants to be that person. That’s where the internet can help with the top things you need to make sure you do and don’t do when you’re camping, overnighting, or just around others. Hey – we’re all in this together, lets see if we can get along.

We created a poll in a couple of our Facebook groups, and these are the top 10 pet peeves from our members.

  1. Visitors who don’t get the hint to leave.
    We’ve all been there. Someone is just in the mood to talk, and no matter how many times you try and exit the conversation, you just can’t get them out the door.
  2. Drunks
    A couple drinks are OK, heck several drinks are OK. But, when you’re the one knocking over things and falling into the campfire…. You’re number 9 on this list.
  3. A** Hole Husbands Living in a Small Space
    We’re not touching this one….
  4. People Complaining About Campfire Smoke
    If you go camping, you know there will be camp fires. Fire makes smoke.
  5. Loud Kids, and Lots of Them
    Kids are one thing. Lots of kids are another thing. Lots and lots of screaming kids in a small area… That’s a whole new level.
  6. Loud Generators
    Birds chirping, crickets cricketing, the wind rustles through the leaves, and your neighbor fires up his 5,000 WATT Harbor Freight generator to vibrate your camper, and rattle your brain. Well, you can’t hear those loud kids anymore!
  7. Loud Music, and It’s Not Even Good Music
    You like country but hate rap?
    You like rap but hate country?
    We don’t all have the same taste, your neighbors might not want to hear your music.
  8. Dog Crap. Everywhere
    It’s not too complicated. You walk your dog, you take some bags. Your dog poops, you pick it up (with the bag!). Even if you have a little dog, and “Oh, it’s just little poops”, it still makes stinky crap on someone else’s shoe. Be a champ, pick it up.
  9. Bark Bark Bark Bark Yap Dogs
    Training. It’s not hard, it just takes dedication and knowledge. Teach your dog not to bark at anyone and everything, and everyone will appreciate it. Seriously, I agree with the poll here, there isn’t much worse than a dog that yaps all day, and will not shut up.
  10. Cutting Through My Spot
    Seriously, there are paths, roads, empty areas, fields, all kinds of ways to get places. Why must you cut right through someone else’s spot? Get the extra few steps – your fitbit, Pokemon, or whatever will appreciate it.

Have a pieve we missed? Something you think is worse than the above? Let us know in the comments!

Easy Way To Store Lodge Cast Iron Pans In An RV Or Travel Trailer

Securing our cast iron pans

Purchase a strap such as this one.  They are fairly cheap and we use them often. We even strap our printer and laptops in place with them. If you are going to strap down multiple pans setting a paper towel in between pans will keep any grease from transferring to the bottoms of other pans in the stack.

storing Lodge Cast Iron Pans safely in a travel trailer

We use the Lodge 12″ Skillet and the Lodge 3.2 Quart Cast Iron Combo. Both have handles on each end. To do this you will need these or similar style cast iron pans with handles at each end.

Lodge Cast Iron Skillet and Pan RV Storage

Take your strap and feed it through the bars of your stove top as seen in the above photo.

strap down Lodge Cast Iron Pans in an RV

Center your pans over the strap and pull buckle through all of the smaller handles in you cast iron pans.

Safely strapping down Lodge cast iron pans for travel mode in a motor home


Take the other end of the strap and wrap it once around all of the long handles of your Lodge cast iron pans.

Clip the clips of your strap together. Make sure to move the pans back and forth a bit and pull the strap tighter as needed. Ours move around as much as a few inches to each side but have never come loose from our stove top in the 3 plus years we have been using this method.

That’s it you are done! No more cast irons bapping around in your fragile cabinets or flying out of doors due to weight!

Here’s a quick video, showing how it’s done.

How Much Solar Does it Take to Full Time RV?

How Much Solar Do You Need?

This is a topic that comes up far more often than you would imagine. First, lets get the basics out of the way, and set some expectations.

If you would like to run your AC and your microwave using solar, you’re going to need thousands of dollars worth of panels. You’re going to need a giant battery bank – we’re talking a whole bay dedicated only to hundreds of dollars in batteries and wire. Keep in mind, all of that adds weight to your rig. Usually, you only have a few thousand pounds of “stuff” you can put in or add to an RV.

Now, on to what you can reasonably power using solar.

Scenario 1

We know a couple who have a single 100 Watt panel and a pair of 6V batteries. Their usage is lighter than ours, allowing their system to:

  • Power and charge laptops
  • Charge phones
  • Power  a light
  • Run the ignition on their fridge

Scenario 2

We built our solar system, starting with the basics. it consisted of two 6V batteries and two 110 watt solar panels (plus controller, wiring, etc.). On nice, bright sunny summer days, we could use this to:

  • Power and charge laptops
  • Charge cell phones
  • Run our LED lights at night
  • Power our inverter for printing labels for our business
  • Handle our refrigerator’s starter/ignition needs
  • Power our water pump

Then, we would head to Florida for the winter, the sun would be low in the sky, the power providing rays would be touching our panels less often, and we would have a serious drop in power. At this point, we upgraded to four 6V batteries. This allowed us to go for longer, but we still were having times when our power was just too low too often. With the price of panels dropping, we added two 100 Watt panels to the system.

Four panels (total around 400 watts) and four 6V batteries seems to be our sweet spot. We have only dipped low (still well above 50%) on one occasion of heavy use, and we were charged back up to full the next morning.

As you can see, these are two similar cases, with our setup being twice that of our friends to handle our needs.

Where to start

If you want to dive right in and just get solar installed, we recommend at minimum a pair of 6V batteries, and two 100 watt panels. This will handle a lot of basic needs. In reality, you are going to want to perform an energy audit, and calculate you real power usage in amp hours. Once you have an idea of how many amp hours you use, you can purchase enough batteries to handle your needs, and enough solar panels to make sure those batteries stay charged.

We aren’t going to dive into that here, as there are tons of resources already online that can help you determine your power needs. Heres a quick verson with links.

  • First, calculate your amp hour usage, using sites like batterystuff or ktbattery
  • Once you have your amp hours calculated, you can now plan how many batteries you need. Remember, your batteries shouldn’t be pulled down to 50% or lower charge. If you need 200 amp hours, you want 400 or more amp hours worth of batteries. Crown 6V GC2 batteries are one of the choices, and are around 220 amp hours.
  • Once you know your battery bank size, based on your needed amp hours, you can calculate how many solar panels you will need to charge those batteries back to 100%. Again, there is a handy calculator at batterystuff and a pile of information at wholesalesolar.

This should give you an idea of what you can realistically run with solar, what you may need, and the tools to get into the nitty gritty of planning, if you so choose. Please leave a comment if this was helpful, or if you have questions!

Looking for more RV’ing tips? Check out our RV How To’s section for all our awesome tips!

How to Receive Mail When Traveling Full Time in an RV

How to Receive Mail When Traveling Full Time

One of the questions that comes up as a traveler is “How can I receive my mail?”. From bills to packages, not staying at a permanent address makes it difficult to receive anything. It’s not like the courier is going to just chase you down!

There are a few options, which depend on how fast you need your package and what method of shipping it will be using – UPS, USPS, FedEx, etc.


For most of our items, we have a permanent address with St. Brendan’s Isle mail service. They receive our mail, scan letters as needed, and hold everything until we are ready to have it sent to us.


When we need a USPS item quickly, we have it shipped General Delivery to a post office near us, or on our upcoming route. This is also how we receive our mail from St. Brendan’s Isle. All of our mail is boxed up and shipped Priority Mail General Delivery.

To receive a general delivery package, you simply find a post office in the area where you would like the package delivered, give them a call to make sure they accept general delivery (some small post offices will not, even if the USPS website says they do), and then have your mail addressed for general delivery to that post office.

The format for a general delivery address is simply:
Your Name
GENERAL DELIVERY
City, State ZIP-9999

Replacing, of course, the italicized portions with your information. Note the “9999” on the ZIP is required and is another way for the post office to know it is a general delivery package.

The easiest solution we have found for receiving a UPS package is to simply have it sent to a UPS store. There is a fee associated with this, usually around $5, but it gives you a location where someone will receive the package, and it will be safely held for you until you arrive.

Fedex Logo
While FedEx is not as common for us to receive packages by, we have found that they are increasing their presence in where items can be dropped off and picked up. In most cases, you will want to simply locate a FedEx location and determine if you may have packages shipped there. FedEx has a tool on their website to help you find a location.

That’s it! You’re now ready to hit the road with no mail worries.

Did we miss anything? Let us know in the comments!

Looking for more RV’ing tips? Check out our RV How To’s section for all our awesome tips!

Available for Amazon Prime